
How To Use A Cricut Mat? [A Full Guide]
Cricut machines are best for creating crafts with accuracy. There are plenty of accessories to use with the Cricut machine. Cricut mat is one of them and the most crucial one. It ensures that your every project will be the way you want. This is why we made a blog to tell you how to use a Cricut mat. Many types of Cricut mats are available in the market with the basic purpose of providing a smooth surface for your Cricut machine to cut the materials. We will also discuss the difference between different Cricut mats and which one you should consider for your crafting project.
Visit site:- Cricut.com/setup
Is It Necessary To Have A Cricut Mat?
Yes,
a Cricut mat is necessary to give us the desired cut by holding the material in
the right place. Plus, it brings an even more stable surface for your material
type. A stable cut is necessary to get the accurate and desired cuts. Some
Cricut machines can work without a mat. Those are Cricut Maker 3, Cricut
Explore 3, and Cricut Joy. Thanks to the smart cutting materials with a firm
backing on them that don't require a mat. Cricut has designed different mats to
provide different surfaces for cutting materials.

For
instance, the LightGrip mat is used to hold lightweight materials such as paper
in place while cutting. On the other hand, a fabric mat is used to hold the
fabric to protect your cut from ruining.
What Sizes Are Available For Cricut Mats?
There
are two main sizes of Cricut mats to hold different projects on the Cricut Maker
and Cricut Explore machines. The standard size for a Cricut mat is 12" X
12"; however these are also available in 12" X 24" for bigger
projects. Cricut Joy has designed a different-sized mat from 4.5" X
6.5" to 4.5" X 12" to cut materials.
How To Fix Materials On Your Cricut Mat?
Once you are ready to cut your projects, it's necessary to place your material correctly on the mat. Look at the orientation in Cricut Design Space on the cut mat screen. It is important for paper projects. If the machine is set to vertical and you place the paper horizontally on the Cricut mat, it will only ruin your cut.
Once you do the orientation,
correctly follow these steps:
- Adjust the corner of the material with the
top left corner of the cut mat.
- Then, press the material smoothly from left
to right and top to bottom.
- You can also use a Brayer tool over your
material to make sure that all parts are aligned to the mat.
- But, if you don't have a Brayer tool, you
can also use your hand to ensure that the material is aligned properly.
How To Load Your Mat Into The Cricut Machine?
When
you are done placing your mat correctly, you need to load it into your Cricut
machine. Then, place your material under the two guide tabs on either side of
your Cricut machine. Now, hold your mat against the roller bar and press the
load mat button at the top of your Cricut. Also, the roller bar will start to
move, and the Cricut mat will load into your machine successfully.
How To Unload Materials From The Cricut Mat?
After your project is cut, you must correctly unload it from the mat to prevent the material from tearing or curling down. If you are using materials such as paper and vinyl, roll over your mat and peel the mat from the back of your material. Then, hold your material flat against the table with one hand while peeling the mat from the material.
However,
some users have put too much pressure on their mats and ruined them. This is
why you don't have to peel back or curve your mat with intense pressure. You
just need a slight curve for your material to take off from the mat.
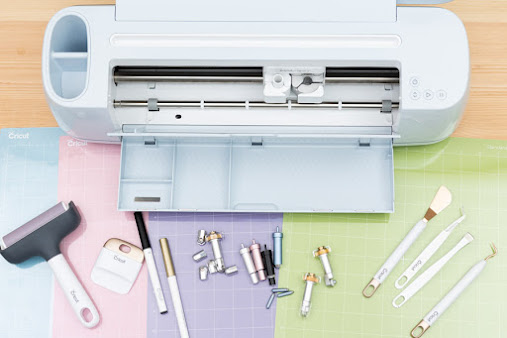
What Are The Types Of Cricut Mats?
There
are mainly four types of Cricut mats.
Blue LightGrip Mat
This
mat has a light adhesive grip and is the best choice for lightweight materials
that you wouldn't want to tear down during the cutting process. These are the
materials Blue LightGrip mat is used with.
- Copy paper
- Construction paper
- Lightweight cardstock
- Vinyl
- Vellum
- Wrapping paper
- Washi tape sheets
Green StandardGrip Mat
This mat has a standard grip adhesive that helps you hold down the materials you want to cut with Cricut. The materials which you can use with the Green StandardGrip mat are:
- Cardstock
- Iron-on vinyl
- Patterned paper
- Embossed cardstock/ textured paper
- Vinyl
Purple HeavyGrip Mat
This
mat has a strong adhesive that helps keep your material stiff in place during
the cutting. Also, you should tape down the materials, such as wood and
leather, to prevent them from moving during the cutting process. For this, you
can use painters tape or washi tape.
The materials to use with the
Purple HeavyGrip mat are:
- Balsa Wood
- Chipboard
- Glitter cardstock
- Magnet material
- Leather or faux leather
- Poster board
- Corrugated cardboard
- Thick cardstock
Pink FabricGrip Mat
As the name suggests, it is designed especially for fabrics. Note that this mat won't stick properly when it gets in contact with oil. This is why you shouldn’t touch the sticky part of the mat with your hands. The materials that you can use with the Pink FabricGrip mat are:
- Crepe paper
- Bonded fabrics
- Felt
Conclusion
I
hope now you understand how to use a Cricut mat. This is an important Cricut
accessory to use with your Cricut machine, except for Cricut Maker 3, Cricut
Explore 3, and Cricut Joy. Apart from this, use the material compatible with
the type of Cricut mats. Cricut mats are essential to provide a stable surface
to your material while cutting. So, when you know its use, load your material
onto it and cut it down with your Cricut machine.


Comments
Post a Comment