
How To Use A Cricut Maker 3 [Complete Step By Step Guide]
So, finally, you buy a new Cricut machine but do not know how to use a Cricut Maker 3? In this blog, you will learn everything about Cricut Maker 3. All you need to do is go through all the blog sections one by one to get all the important things related to the device. If you are a beginner, then you are at the right place.
Be ready to start using the Cricut Maker 3 on your own. This guide teaches you everything you need while using the machine. We’ll cover important points of how it works and what you require. After reading the blog, you will jump from beginner to professional, so keep scrolling and learning.
So, without wasting
time, let’s start discussing its important points and how to use the Cricut
Maker 3.
What is Cricut Maker 3?
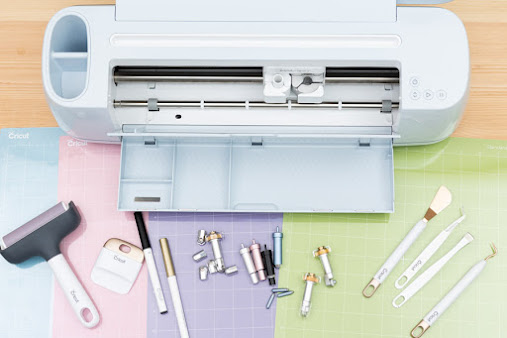
A Cricut Maker 3 is
a powerful device that cuts 100 types of materials. It is an electronic device
that can make cuts and designs such as adhesive vinyl, card stock, and heat
transfer vinyl. This machine is specially used for making the cut, embossing,
drawing, perforating, engraving, and scoring various types of materials. It is
also very easy to handle and compatible with many other devices.

Installation Process of Cricut Maker 3
The most important
thing every beginner must know is how to install the Cricut Maker 3. If you
install the Cricut Maker 3 in the right
place, then this is good for you because it is easy to use and compatible with
your device. You can also make your projects very smooth.
- Initially, take your Cricut machine out from its packed box.
- Connect all the cables and wires and click on the ON button.
- Now, your Cricut machine is ON.
- Open your Cricut Design Space software and click on the sign-in button.
- Choose the Make It button to start your task or make your own design.
- Select Smart Set Dial.
- Now, set your Cricut cutting mat.
- Press the Cricut button and start your device to do your work.
- Finally, take out the Cricut mat, take your project out, and enjoy
your first final complete project.
Kinds of Materials You Can Cut with Your Cricut Maker 3
You can use this
machine to cut a huge variety of materials. It easily cuts the soft as well as
hard materials in a go. Here are some of the materials that the machine cuts:
●
Cardstock
●
Butcher Paper
●
Chalkboard Vinyl
●
Glitter Cardstock
●
Washi Tape
●
Removable Vinyl
●
Aluminum Foil
●
Craft Foam
●
Faux Leather
●
Magnetic Sheet
●
Iron-On Vinyl
Types of Projects You Can Make with Your Cricut Maker 3
Many types of shocking projects impress the public to buy them. In this blog section, you will know some of the most amazing projects you have to make with your Cricut Maker 3. Here Are the most impressive projects you can make with this machine:
●
Handmade greeting cards
●
Iron-on t-shirts and onesies
●
Monograms for a cup, mug, or
tumbler
●
Leather bracelets and earrings
●
Address invitations and envelopes
●
Party decorations and paper
banners
●
Custom stickers
●
Stencils for glass etching
●
Custom painted wooden sign
How to Download and Install the Design Space?
To use a Cricut
Maker 3, you must first download and install the Design Space on your
system. Here are the steps that you need to follow to complete both the
process:
On Windows Operating System
Follow these steps
that are given below in this section:
- Initially, open your internet browser and type design.cricut.com. Now, press the enter button.
- Now, click on the Download option on your display. When the downloading is started, the screen is changed into downloading progress.
- You need to double-click on the download file from the browser when it is completely downloaded or select it from the Downloads folder.
- Now, select the option trust if it prompts you to ask (if you trust the application).
- A setup window will open on your screen, and it shows the installation progress.
- Enter your Cricut username and password after clicking on the sign-in button.
- Now, a Design Space icon is added to your desktop; you need to right-click on it and Pin to Taskbar or move it to the Taskbar.
- Finally, let's start doing your project.
How do I Pair My Cricut Maker 3 Via Bluetooth?
Before jumping to
the process of how to use a Cricut
Maker 3, firstly pair your device. Here are the steps that you have to
use to pair your Cricut Maker machine:
On Windows Operating System
Follow these steps:
- Initially, ensure that the Cricut Maker 3 is on and placed under 10-15 feet of the distance of the PC.
- To determine if your computer is Bluetooth enabled, click on the Start button and then go to the Device Manager.
- Now, a list is opened, and if you see Bluetooth under this list, then your system is Bluetooth enabled; otherwise, you use the Bluetooth Dongle to enable your PC.
- Exit from the Device Manager.
- Go to the Start menu and click on Settings.
- Navigate to the Devices option.
- Make sure Bluetooth is turned on and click on the Add Bluetooth or other device button.
- Click on Bluetooth and wait until the computer finds your machine; now, choose your device.
- Type 0000; if it pops up to enter a PIN, click on Connect.
- Finally, your Cricut Maker 3 is paired with your PC.
How to Use A Cricut Maker 3 With Design Space?
In this section,
you just need to go through all the provided steps one by one to know how to
use a Cricut Maker 3. Here are the
steps that you need to follow:
- Initially, insert the printable images into your task. Now, choose the option to make it by using the Cricut Design Space.
- Now, your image is attached to the cut sensor marking, and then click on Continue to move forward to the cut interaction.
- And from the drop-down menu, choose the device and click on the Send option to go to the Print and Cut dialog.
- Next, when the cut process is completed, it will automatically show as an image leaving the white border line.
- Finally, use your printer to print the page, place the paper under the Cricut cutting mat, and adjust it in the machine. Now, your paper is cutting through sensor marking.


Comments
Post a Comment